
Introduction
Apache Hadoop is an open-source framework that can develop open-source software for scalable, reliable and distributed computing. Hadoop allows distributed processing of large data sets across clusters (Collection of computers) using simple programming models such as MapReduce. The main advantage of Hadoop is that it is entirely scalable. Let’s move forward with learning how to install Hadoop on Ubuntu.
It is designed to scale upwards from a single server to hundreds and thousands of machines. Also, each machine offers local storage as well as communication. Amazing, isn’t it?
To err is human, to forgive is divine. We all wish we can mitigate the effects of our faults. But that’s not the case for a network running with thousands of machines. It is something which they can’t afford. To vanquish that issue, Hadoop is designed to detect and handle failures at any cluster efficiently.
Latest Hadoop 3.0.0 comprises these main modules:
- Hadoop Common
- Hadoop Distributed File System
- Hadoop YARN
- Hadoop MapReduce
Let’s walk through Hadoop installation on your Linux distribution and start running your first MapReduce program in Hadoop. All you need is a computer with Linux installed, internet connection of course and patience. Yes, patience. The operating system I am using is Ubuntu 17.10 and distribution of Hadoop is 3.0.0 because it is the latest stable release. By the end of the post, you’ll know how to install Hadoop on ubuntu.
Hadoop Installation Steps
STEP 1 – Separate Login
Hit CTRL+ALT+T to get started. We will install Hadoop from the terminal. For new Linux users, things might get confusing while installing different programs and managing them from the same login. If you are one of them, we have a solution. Let’s create a new dedicated Hadoop user. Whenever you want to use Hadoop, just use the separate login. Simple.
$ sudo addgroup Hadoop
$ sudo adduser –ingroup hadoop hduser
Note: You do not have to write passwords or names. Just hit enter and press ‘y’ at the end.
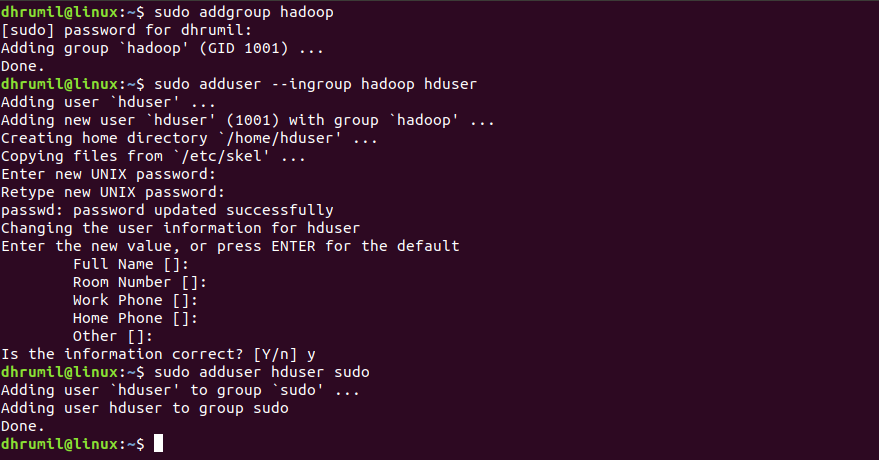
Add Hadoop user to sudo group (Basically, grant it all permissions)
$ sudo adduser hduser sudo
STEP 2 – Getting Environment Ready
In order to run perfectly, Hadoop needs basic two things in Ubuntu environment. First is Java 1.6 or higher because Hadoop’s distributed processing and storage are written in Java. Second is ssh(Secure Shell) for the security of the communication between the nodes of the cluster.
It is always better to update the package list before installing anything new. Let’s get started. Update package list,
$ sudo apt-get update
2.1 Install JAVA
Next, we will install the default java development kit “OpenJDK”
$ sudo apt-get install default-jdk
Once it is installed, check the java version. I have 1.8 installed which is higher than the required 1.6 so we are good to go.
$ java -version
![]()
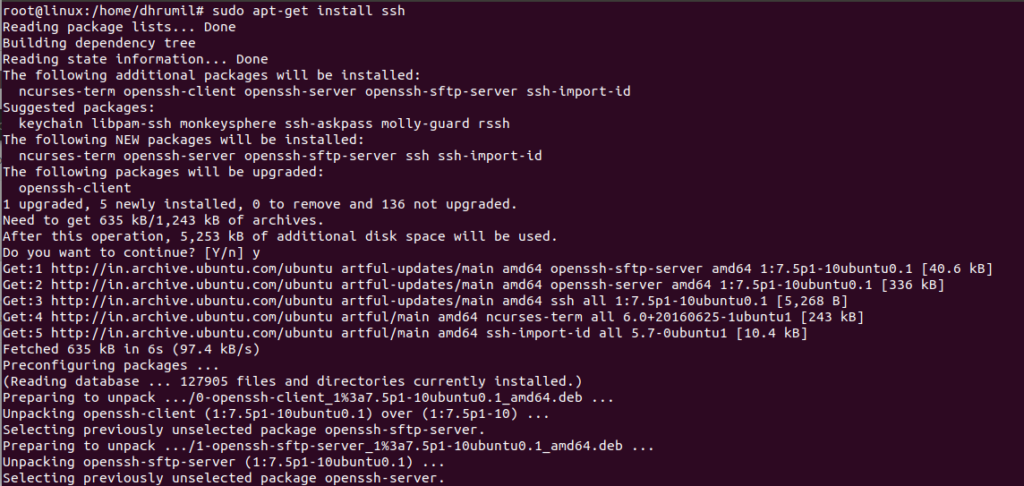
2.2 Install SSH
$ sudo apt-get install ssh
Passwordless entry for localhost using SSH
$ su hduser
$ sudo ssh-keygen -t rsa
Note: When ask for file name or location, leave it blank.
$ cat ~/.ssh/id_rsa.pub >> ~/.ssh/authorized_keys
$ chmod 0600 ~/.ssh/authorized_keys
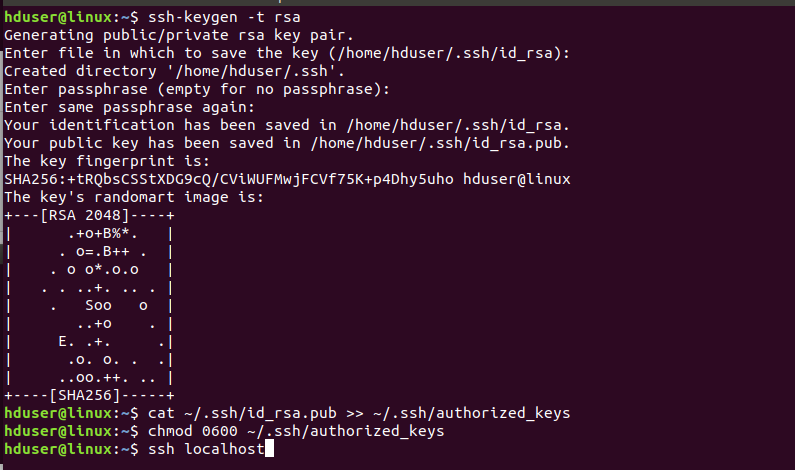
Check if ssh works,
$ ssh localhost
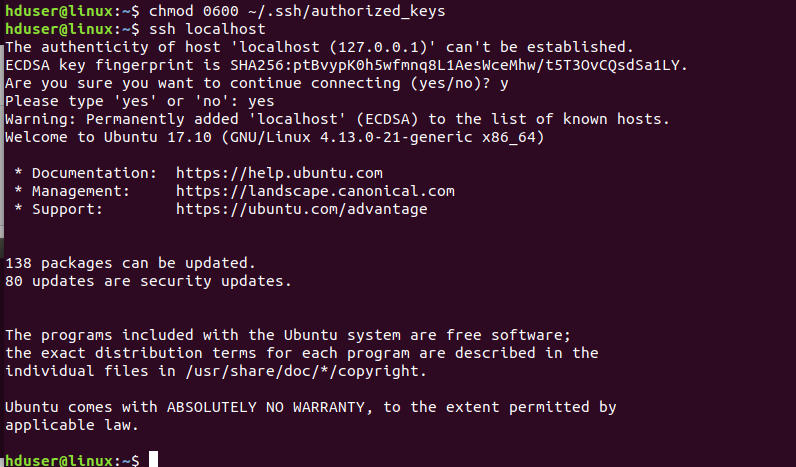
Once we are logged in localhost, exit from this session using following command.
$ exit

STEP 3 – Install Hadoop on Ubuntu
The environment is now ready to install hadoop on ubuntu. Moreover, the procedure to install hadoop on linux (for the newer versions) will remain same. Only the folder name changes from hadoop-3.0.0 to hadoop-x.y.z
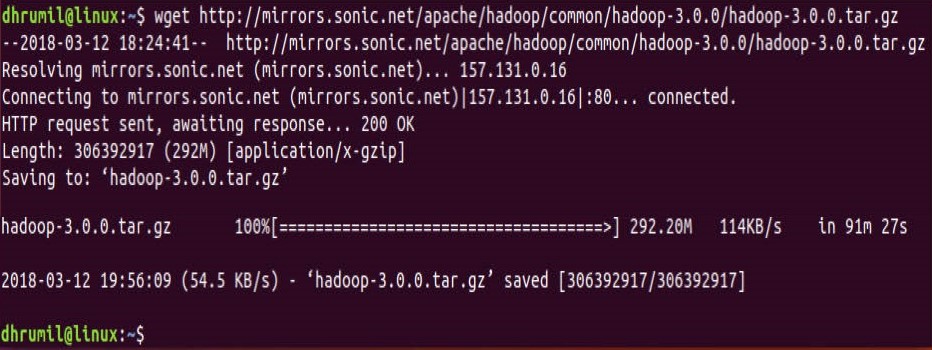
3.1 Download Hadoop
$ wget http://mirrors.sonic.net/apache/hadoop/common/hadoop-3.0.0/hadoop-3.0.0.tar.gz
Unzip it
$ tar xvzf hadoop-3.0.0.tar.gz
3.2 Hadoop Configuration
Make a directory called hadoop and move the folder ‘hadoop-3.0.0’ to this directory
$ sudo mkdir -p /usr/local/hadoop
$ cd hadoop-3.0.0/
$ sudo mv * /usr/local/hadoop
$ sudo chown -R hduser:hadoop /usr/local/hadoop

STEP 4 – Setting up Configuration files
We will change content of following files in order to complete hadoop installation.
- ~/.bashrc
- hadoop-env.sh
- core-site.xml
- hdfs-site.xml
- yarn-site.xml
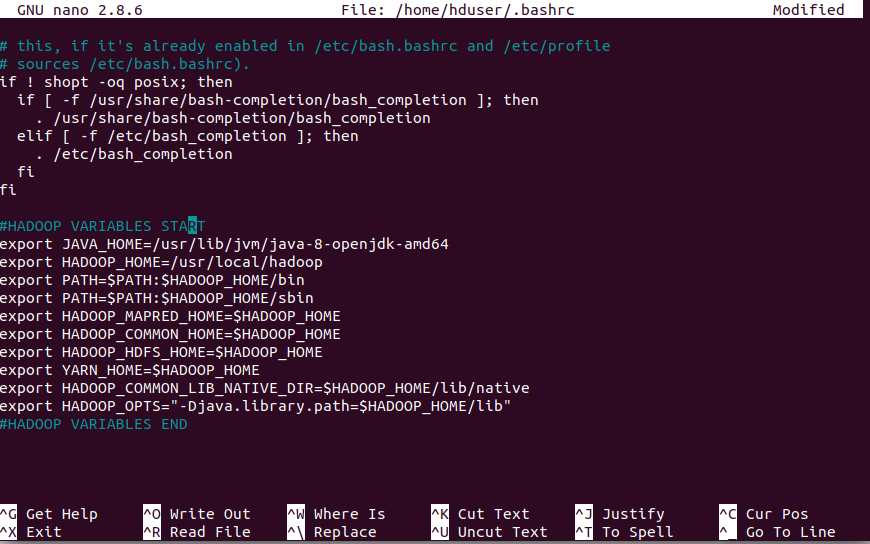
4.1 ~/.bashrc
If you don’t know the path where java is installed, first run the following command to locate it
$update-alternatives –config java

Now open the ~/.bashrc file
$sudo nano ~/.bashrc
Note: I have used ‘nano’ editor, you can use a different one. No issues.
Now once the file is opened, append the following code at the end of file,
#HADOOP VARIABLES START
export JAVA_HOME=/usr/lib/jvm/java-8-openjdk-amd64
export HADOOP_HOME=/usr/local/hadoop
export PATH=$PATH:$HADOOP_HOME/bin
export PATH=$PATH:$HADOOP_HOME/sbin
export HADOOP_MAPRED_HOME=$HADOOP_HOME
export HADOOP_COMMON_HOME=$HADOOP_HOME
export HADOOP_HDFS_HOME=$HADOOP_HOME
export YARN_HOME=$HADOOP_HOME
export HADOOP_COMMON_LIB_NATIVE_DIR=$HADOOP_HOME/lib/native
export HADOOP_OPTS=”-Djava.library.path=$HADOOP_HOME/lib”
#HADOOP VARIABLES END
Press CTRL+O to save and CTRL+X to exit from that window.
Update .bashrc file to apply changes
$source ~/.bashrc
4.2 hadoop-env.sh
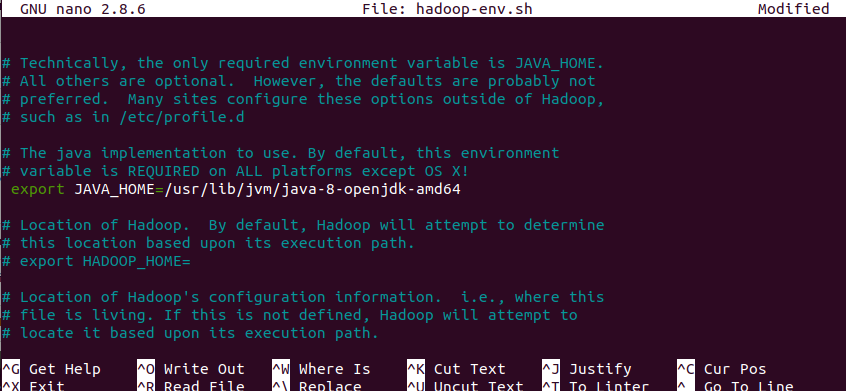
We need to tell Hadoop the path where java is installed. That’s what we will do in this file, specify the path for JAVA_HOME variable.
Open the file,
$sudo nano /usr/local/hadoop/etc/hadoop/hadoop-env.sh
Now, the first variable in file will be JAVA_HOME variable, change the value of that variable to
export JAVA_HOME=usr/lib/jvm/java-8-openjdk-amd64
4.3 core-site.xml
Create temporary directory
$ sudo mkdir -p /app/hadoop/tmp
$ sudo chown hduser:hadoop /app/hadoop/tmp
Open the file,
$sudo nano /usr/local/hadoop/etc/hadoop/core-site.xml
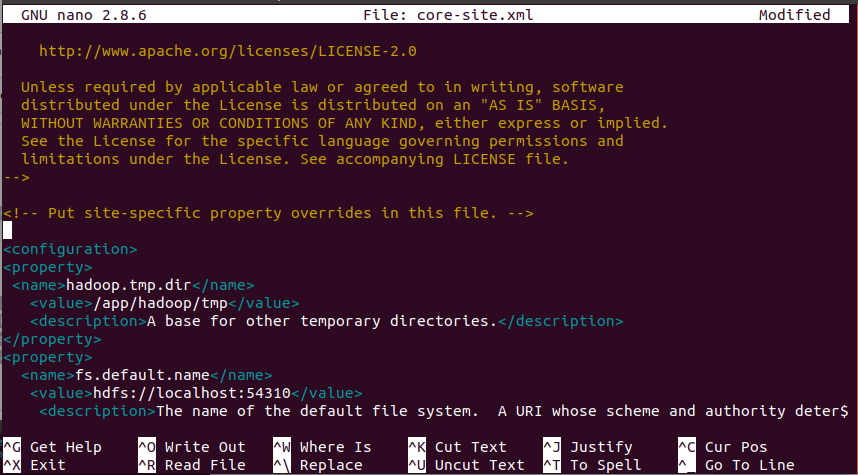
Append the following between configuration tags. Same as below.
<configuration>
<property>
<name>hadoop.tmp.dir</name>
<value>/app/hadoop/tmp</value>
<description>A base for other temporary directories.</description>
</property>
<property>
<name>fs.default.name</name>
<value>hdfs://localhost:54310</value>
<description>The name of the default file system. A URI whose scheme and authority determine the FileSystem implementation. The uri’s scheme determines the config property (fs.SCHEME.impl) naming the FileSystem implementation class. The uri’s authority is used to determine the host, port, etc. for a filesystem.</description>
</property>
</configuration>
4.4 hdfs-site.xml
Mainly there are two directories,
- Name Node
- Data Node
Make directories
$ sudo mkdir -p /usr/local/hadoop_store/hdfs/namenode
$ sudo mkdir -p /usr/local/hadoop_store/hdfs/datanode
$ sudo chown -R hduser:hadoop /usr/local/hadoop_store
Open the file,
$sudo nano /usr/local/hadoop/etc/hadoop/hdfs-site.xml
Change the content between configuration tags shown as below.
<configuration>
<property>
<name>dfs.replication</name>
<value>1</value>
<description>Default block replication.The actual number of replications can be specified when the file is created. The default is used if replication is not specified in create time.
</description>
</property>
<property>
<name>dfs.namenode.name.dir</name>
<value>file:/usr/local/hadoop_store/hdfs/namenode</value>
</property>
<property>
<name>dfs.datanode.data.dir</name>
<value>file:/usr/local/hadoop_store/hdfs/datanode</value>
</property>
</configuration>
4.5 yarn-site.xml
Open the file,
$sudo nano /usr/local/hadoop/etc/hadoop/yarn-site.xml
Just like the other two, add the content to configuration tags.
<configuration>
<property>
<name>yarn.nodemanager.aux-services</name>
<value>mapreduce_shuffle</value>
</property>
</configuration>
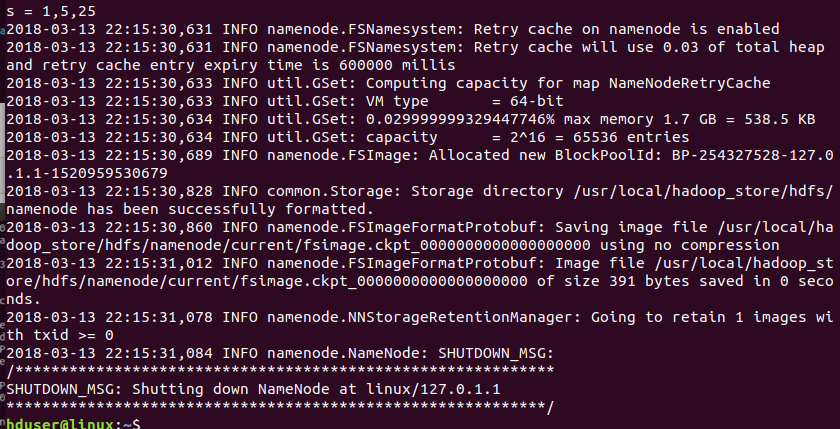
STEP 5- Format Hadoop file system
Hadoop installation is now done. All we have to do is change format the name-nodes before using it.
$ hadoop namenode -format
STEP 6- Start Hadoop daemons
Now that hadoop installation is complete and name-nodes are formatted, we can start hadoop by going to following directory.
$ cd /usr/local/hadoop/sbin
$ start-all.sh
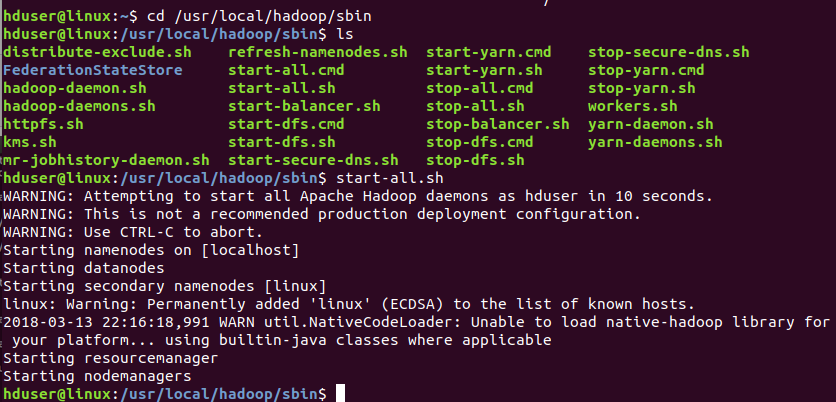
Just check if all daemons are properly started using the following command:
$ jps

STEP 7 – Stop Hadoop daemons
Step 7 of hadoop installation is when you need to stop Hadoop and all its modules.
$ stop-all.sh
Appreciate yourself because you’ve done it. You have completed all the Hadoop installation steps and Hadoop is now ready to run the first program.
Let’s run MapReduce job on our entirely fresh Hadoop cluster setup
Go to the following directory
$ cd /usr/local/hadoop
Run the following command
hadoop jar ./share/hadoop/mapreduce/hadoop-mapreduce-examples-3.0.0.jar pi 2 5
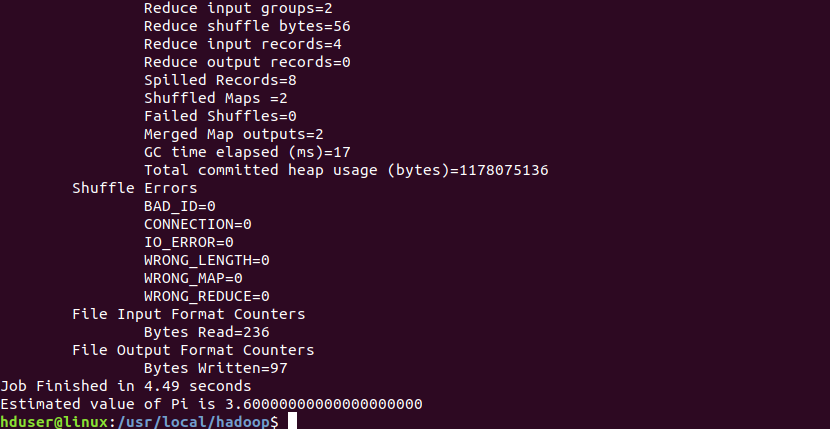
Hooray! It’s done.
Happy Learning.


hello sir thank you for this great tutorial i followed the same steps as u did but i m having a problem in the sixth step
What kind of problem are you having?
Thank you. Glad you find it useful.
Help me!
Error: Could not find or load main class ”-Djava.library.path=.usr.local.hadoop.lib”
Caused by: java.lang.ClassNotFoundException: ”-Djava.library.path=.usr.local.hadoop.lib”
what should i do???
Same error
Caused by: java.lang.ClassNotFoundException: ”-Djava.library.path=.usr.local.hadoop.lib”
What should we do !